Core Concepts
This section covers the fundamental design principles of the GenAI for Unreal plugin. Understanding these concepts will help you use the plugin effectively and avoid common pitfalls.
1. Finding and Using Plugin Nodes
The plugin follows a consistent naming convention to make its features easily discoverable.
In Blueprints
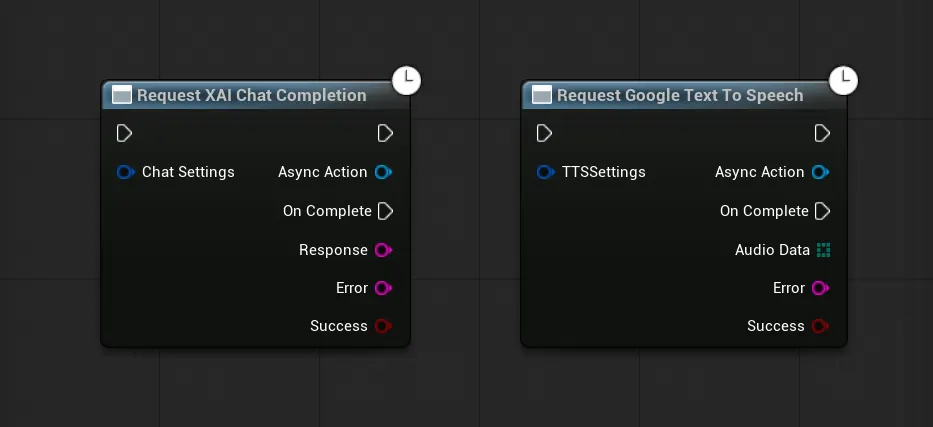
All asynchronous Blueprint nodes start with “Request” followed by the provider and the service. You can find any function by simply searching for this pattern in the Blueprint context menu.
Request OpenAI Chat CompletionRequest Google Text To SpeechRequest Anthropic Chat Stream
In C++
The static C++ functions follow a similar pattern, typically starting with “Send”.
UGenOAIChat::SendChatRequest(...)UGenGoogleTTS::SendTextToSpeechRequest(...)UGenAnthropicChatStream::SendStreamChatRequest(...)
2. Unified Settings Structs & Model Selection
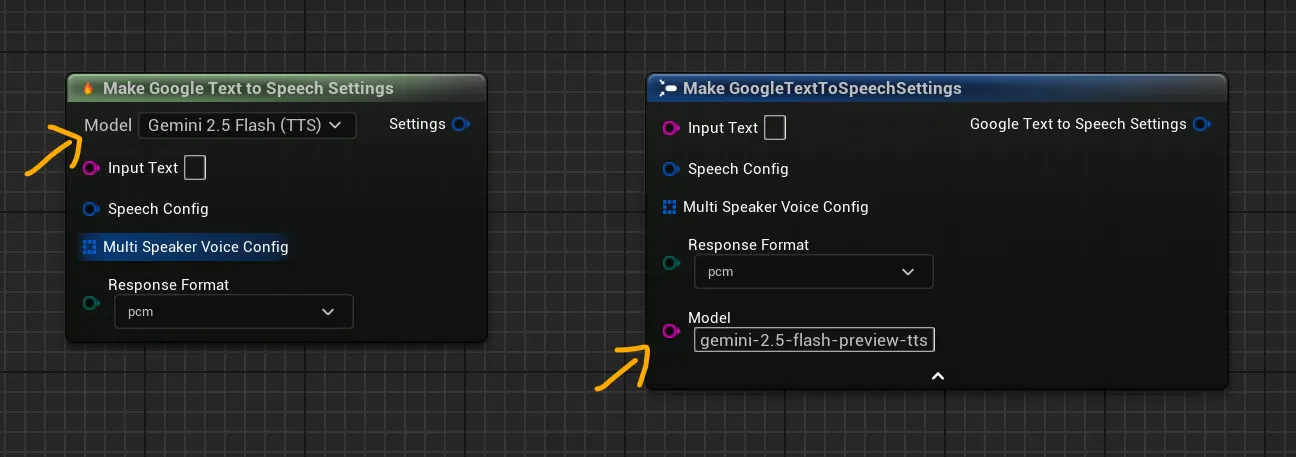
Every API request is configured using a dedicated Settings struct (e.g., FGenOAIChatSettings). In Blueprints, you use a “Make…“ node to create these structs. With the latest update, you now have two powerful ways to select a model:
The Dropdown Node (Recommended)
For convenience and to prevent typos, the plugin now includes advanced “Make…” nodes with a fire logo. These nodes feature a dropdown menu that is dynamically populated with all the known supported models for that provider. This is the easiest and recommended way to select a model.
The String Input Node
For maximum flexibility, the standard “Make…” node is still available. This node allows you to specify a model by typing its exact API ID into the Model (String) or Custom Model Name input field. This is useful for:
- Using a brand-new model that hasn’t been added to the dropdown yet.
- Dynamically selecting a model at runtime based on a variable.
Important: The string input will always override the enum dropdown if both are set.
3. Asynchronous by Design
All API calls in this plugin are asynchronous (non-blocking). This is essential to prevent your game from freezing while it waits for a response from a web server. The workflow is always:
- You call a function to send a request.
- You provide a callback delegate (in C++) or connect to an event pin (in Blueprints).
- Your game continues running without interruption.
- When the response arrives, your callback function or event is executed with the result.
4. Automatic Lifetime Management
A critical challenge in Unreal with asynchronous operations is Object Lifetime. If an Actor is destroyed while a request is still in-flight, the callback can try to access invalid memory, causing a crash. The plugin solves this automatically for you.
Blueprint Solution: Built-in Safety
Blueprint nodes are built on UCancellableAsyncAction and are inherently safe. They use weak pointers to track the calling object and will automatically skip the callback if the object has been destroyed.
C++ Solution: Developer-Managed Safety
When calling the static C++ functions, you are responsible for managing lifetime. The required pattern is to capture a TWeakObjectPtr in your callback lambda.
// Essential C++ safety pattern
void AMyActor::RequestData()
{
    TWeakObjectPtr<AMyActor> WeakThis(this);
    UGenOAIChat::SendChatRequest(Settings, Messages,
        FOnChatCompletionResponse::CreateLambda([WeakThis](/*...params...*/)
        {
            // CRITICAL: Always check if the object is still valid.
            if (!WeakThis.IsValid()) return;
            WeakThis->HandleResponse(/*...params...*/);
        })
    );
}
5. Extended Debug Mode
To help with troubleshooting, the plugin now includes an Extended Logging Mode. When enabled, every API request and response will be printed to the Unreal output log.
- What it Logs: The full request body (including headers and parameters) and the full response from the server.
- Security: To prevent log spam and protect data, any
base64encoded strings (typically used for images) will be truncated in the log output. - How to Enable:
- Go to Project Settings > Plugins > GenAI Plugin.
- Find the “Enable Extended Logging Mode” checkbox and enable it.
This is an invaluable tool for debugging issues with your API calls without needing external network monitoring tools.
6. Dynamic Model Discovery (Get All Models)
The plugin now provides a function to fetch a list of all available models directly from the provider’s API. This is perfect for building UIs that let users choose from the most up-to-date model list.
- Blueprint Node:
Request Get All [Provider] Models(e.g.,Request Get All OpenAI Models). - C++ Function:
UGenOAIModels::SendListModelsRequest(...).
This feature is demonstrated in the new example projects to populate the model selection dropdowns in the UMG widgets.
7. OpenAI Compatible Mode
For advanced users who want to route all OpenAI API calls to compatible providers (such as local LLMs or other OpenAI-compatible services), the plugin includes a global compatibility mode. When enabled, all requests that would normally target OpenAI will instead use the ‘OpenAI Compatible’ API key and endpoint configured in the settings panel.
This mode is controlled via Blueprint nodes:
Set OpenAI Compatible Modeto enable/disable the routing.Is OpenAI Compatible Mode Enabledto check the current state.
See the OpenAI Compatible Mode page for detailed setup and usage instructions.