Getting Started
This guide walks you through installing the plugin, configuring it, and generating your first 3D model.
Installation
- Install the plugin from the Fab marketplace to your engine version.
- Open your Unreal project and go to Edit > Plugins.
- Search for GenAI Model Generator and enable it.
- Restart the editor if prompted.
(Optional) For C++ Projects
Add the module dependency to your project’s .Build.cs file:
PublicDependencyModuleNames.AddRange(new string[] { "GenAIModelGen" });
Configuration
- Go to Project Settings > Plugins > GenAI Model Generator.
- Enter your API key(s) for the providers you want to use (see Getting API Keys).
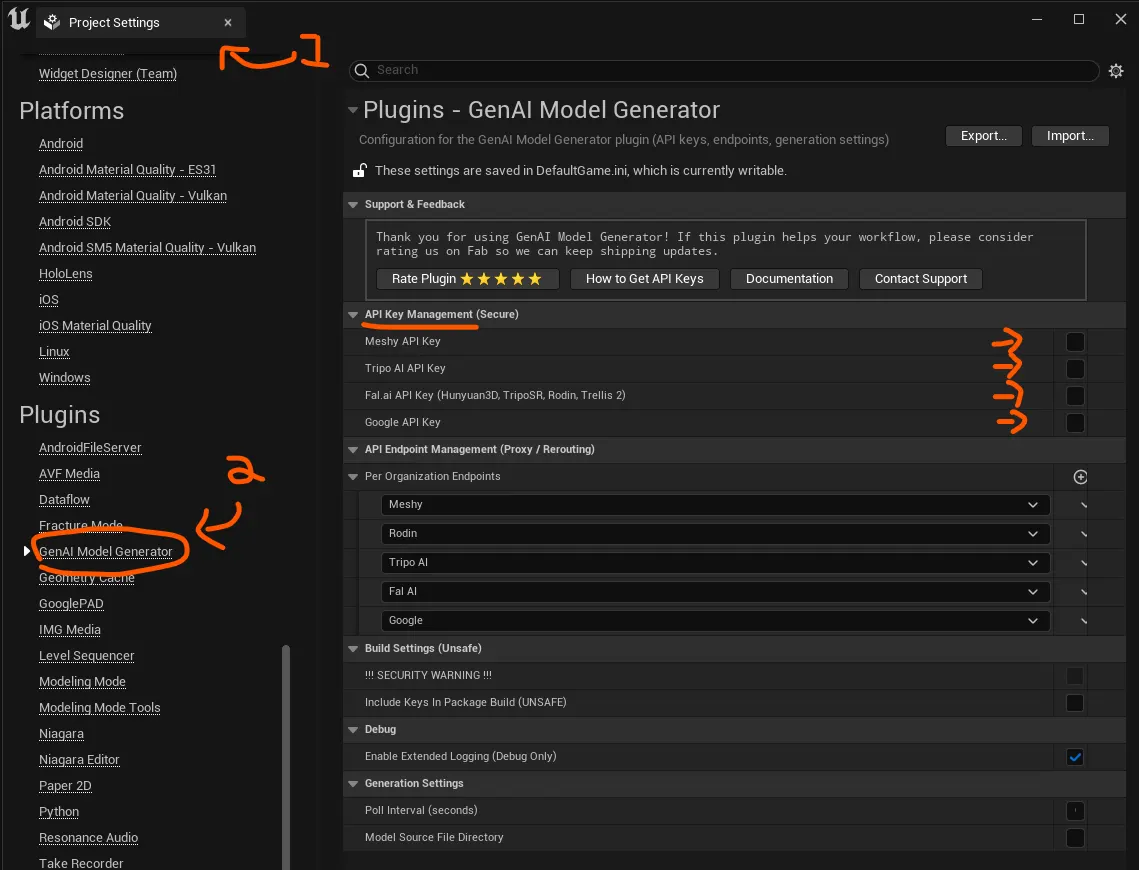
- Optionally adjust the Poll Interval (default: 6 seconds) — this controls how frequently the plugin checks for generation task completion.
- Enable Extended Logging if you want to see full request/response JSON in the output log (large fields like base64 images are automatically truncated).
Compatibility: Supports Unreal Engine 5.1 through 5.7 on Windows, macOS, and Linux.
Editor Widget — Your Main Tool
The plugin includes a full Slate editor widget for generating models without writing code. Open it from the toolbar button or Window > AI Model Generator or by simply pressing the 🔥 icon on the top tab.
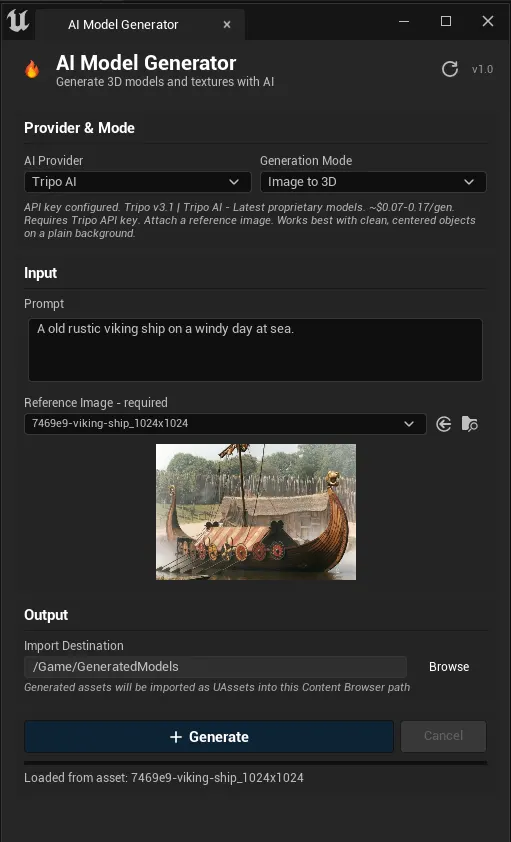
Widget Layout
-
Provider & Mode — Select your AI provider and generation mode. Modes update dynamically per provider (e.g., TripoSR only shows Image-to-3D, Meshy shows all five modes including Auto-Rig and Remesh).
-
Input — Prompt text field and/or reference image picker. The hint text changes based on the selected mode.
-
Contextual Help — Below the inputs, shows the underlying AI model, approximate cost per generation, API key status, and workflow tips.
- Advanced Settings — Provider-specific tuning (only shown for providers that support it):
- Meshy AI (3D Gen): Art style (realistic, cartoon, sculpture, pbr), target polycount (100–300K), enable PBR
- Meshy AI (Auto-Rig): Height in meters (0.1–10.0m, default 1.7m) for correct skeleton scale
- Meshy AI (Remesh): Target polycount, topology (triangle/quad), auto-size toggle, resize height
- Tripo AI (Auto-Rig): Rig type (biped, quadruped, hexapod, octopod, avian, serpentine, aquatic), animation preset (idle, walk, run, jump, slash, shoot, dive, climb, hurt, fall, turn)
- Tripo AI (Smart LowPoly): Face limit (1,000–20,000), quad faces toggle, bake textures toggle
- Fal.ai - Hunyuan3D: Inference steps (1–100), guidance scale (1–20), face count (40K–1.5M), geometry-only mode, enable PBR
- Fal.ai - Trellis 2: Resolution (256–2048), texture size (512–4096), decimation target
- Rodin: Quality mesh option, material mode (PBR/Shaded)
- Google Texture Gen: Texture map type selector (base color, normal, roughness, metallic, full PBR)
-
Output — Import destination path with browse button. Generated assets are imported directly as UAssets.
-
Generate / Cancel / Reset — Generate button with live progress bar and elapsed timer. Cancel stops in-flight tasks. Reset clears all fields.
- Result Preview — Shows a thumbnail of the last generated result with an “Open in Editor” button.
Generation Workflows
Text-to-3D
Available with: Meshy AI, Tripo AI, Fal.ai - Hunyuan3D, Fal.ai - Rodin
- Select a provider that supports Text-to-3D.
- Type a prompt describing the object (e.g., “a medieval sword with ornate handle”).
- Click Generate.
- The model is downloaded and imported into your Content Browser.
Meshy AI uses a two-step process (handled automatically):
- Preview (~20 credits) — generates the 3D mesh geometry
- Refine (~10 credits) — applies textures and materials
Progress is scaled: 0–50% = preview, 50–100% = refine. If Enable PBR is checked, the refine step also generates metallic, roughness, and normal maps.
Image-to-3D
Available with: All providers (every 3D provider supports this mode)
- Select any 3D provider and Image-to-3D mode.
- Attach a reference image using the asset picker.
- Click Generate.
Works best with clean, well-lit images of a single object on a plain background.
Reference Image + Image-to-3D (Recommended Pipeline)
For the best results, generate a clean reference image first:
- Select Google (Texture Gen) > Reference Image mode.
- Describe the object you want (e.g., “a cartoon robot with big eyes”).
- Generate — produces a clean concept image optimized for 3D generation.
- Switch to any 3D provider > Image-to-3D mode.
- Attach the generated reference image.
- Generate the 3D model.
Auto-Rigging (Meshy AI)
Automatically rigs textured humanoid models with a skeleton and generates walking + running animations. Marked as experimental — skeleton scale may need manual adjustment.
Seamless workflow (recommended):
- Generate a humanoid model with Meshy AI > Text-to-3D or Image-to-3D.
- Switch to Auto-Rig (Experimental) mode — the plugin automatically uses the last generated Meshy task ID.
- Adjust Height in Advanced Settings if needed (0.1–10.0m, default 1.7m).
- Click Generate — the rigged model is downloaded and imported as a SkeletalMesh.
Manual workflow:
- Select Meshy AI > Auto-Rig (Experimental).
- Attach a textured humanoid GLB model via the mesh picker.
- Click Generate.
Constraints: Humanoid models only, must be textured, max 300K faces when using a Meshy task ID. Walking and running animation URLs are logged and available in the result struct for manual download.
Auto-Rigging (Tripo AI)
Tripo’s auto-rig supports a much wider range of creature types and runs as a 3-step chained pipeline:
- Pre-Rig Check — detects if the model is riggable and identifies the rig type
- Rig — applies the skeleton based on the detected or selected rig type
- Retarget — applies the selected animation preset to the rigged model
Progress is scaled across the chain: 0–30% pre-rig check, 30–60% rigging, 60–100% retarget + download.
Supported rig types: Biped, Quadruped, Hexapod, Octopod, Avian, Serpentine, Aquatic
Animation presets: Idle, Walk, Run, Jump, Slash, Shoot, Dive, Climb, Hurt, Fall, Turn
Workflow:
- Generate a model with Tripo AI > Text-to-3D or Image-to-3D.
- Switch to Auto-Rig mode.
- Select rig type and animation in Advanced Settings.
- Click Generate — the 3-step chain runs automatically.
Retexture (Meshy AI / Tripo AI)
Apply new AI-generated textures to an existing 3D model.
Meshy AI:
- Select Meshy AI > Retexture mode.
- Attach an existing 3D model (GLB/FBX/OBJ) via the mesh picker.
- Describe the desired texture style in the prompt. Supports negative prompts.
- Click Generate.
Tripo AI:
- Generate a model with Tripo AI first.
- Switch to Retexture mode — the plugin chains from the last Tripo generation task ID automatically.
- Enter a texture prompt describing the desired look.
- Click Generate.
Smart LowPoly (Tripo AI)
Convert a high-poly model to a hand-crafted low-poly version with baked textures — ideal for game-ready assets.
- Generate a model with Tripo AI first.
- Switch to Smart LowPoly mode.
- Configure in Advanced Settings:
- Face Limit: Target face count (1,000–20,000, default 5,000)
- Quad Faces: Output quad topology instead of triangles
- Bake Textures: Bake high-poly textures onto the low-poly mesh
- Click Generate — outputs a game-ready low-poly mesh.
Remesh (Meshy AI)
Retopologize and optimize an existing mesh with control over target polycount and topology type.
- Generate a model with Meshy AI first, or attach an existing mesh.
- Switch to Remesh mode.
- In Advanced Settings, configure target polycount (default 30,000) and topology (Triangle or Quad).
- Optionally enable Auto Size to automatically scale the model, or set a manual Resize Height.
- Click Generate — outputs an optimized mesh.
Texture Generation (Google Only)
Generate seamless PBR texture maps:
- Select Google (Texture Gen) > Texture Generation mode.
- Describe the texture (e.g., “weathered stone wall with moss”).
- In Advanced Settings, choose the map type: Base Color, Normal, Roughness, Metallic, or Full PBR Set.
- Optionally attach a reference image for style guidance.
- Generate — the texture is saved and imported as a UTexture2D.
Provider Comparison — Which One Should I Use?
| Goal | Recommended Provider | Why |
|---|---|---|
| Best overall quality | Meshy AI (Meshy-6) | Latest proprietary model, two-step refine process, best textures |
| Cheapest prototyping | Fal.ai - TripoSR | $0.07/gen, fast (<1s), no subscription |
| Best free tier | Tripo AI | 300 free credits/month (~24 generations) |
| Highest quality open-source | Fal.ai - Hunyuan3D v3.1 Pro | Tencent’s best text-to-3D, $0.48/gen |
| Best PBR materials | Fal.ai - Trellis 2 | Microsoft model, full PBR set included |
| High quality, no subscription | Fal.ai - Rodin Gen-2 | Hyper3D’s Gen-2 model, PBR, $0.40/gen |
| Humanoid rigging | Meshy AI (Auto-Rig) | Automatic skeleton + walking/running animations |
| Creature rigging | Tripo AI (Auto-Rig) | Biped, quadruped, avian, serpentine, and more |
| Game-ready optimization | Tripo AI (Smart LowPoly) | Hand-crafted low-poly with baked textures |
| Texture maps | Google (Texture Gen) | ~$0.04/image, all PBR map types |
Your First Generation (C++)
Text-to-3D with Meshy
#include "Models/Meshy/GenMeshyTextTo3D.h"
#include "Data/Meshy/GenMeshyStructs.h"

void AMyActor::GenerateModel()
{
    FGenMeshyTextTo3DSettings Settings;
    Settings.Prompt = TEXT("A medieval sword with ornate handle");
    Settings.ArtStyle = TEXT("realistic");
    Settings.TargetPolycount = 30000;
    Settings.bAutoRefine = true;  // Auto-chains preview → refine

    UGenMeshyTextTo3D* Action = UGenMeshyTextTo3D::RequestTextTo3D(this, Settings);
    Action->OnComplete.AddDynamic(this, &AMyActor::OnModelComplete);
    Action->OnProgress.AddDynamic(this, &AMyActor::OnModelProgress);
    Action->Activate();
}
Image-to-3D with Fal.ai
#include "Models/FalAI/GenFalImageTo3D.h"
#include "Data/FalAI/GenFalStructs.h"

void AMyActor::GenerateFromImage()
{
    FGenFalImageTo3DSettings Settings;
    Settings.FalModel = EGenFalModel::Hunyuan3D;  // or TripoSR, Rodin, Trellis2
    Settings.ImageBytes = MyImageBytes;  // TArray<uint8> of PNG/JPG data
    Settings.NumInferenceSteps = 30;     // Hunyuan3D only
    Settings.GuidanceScale = 5.5f;       // Hunyuan3D only

    UGenFalImageTo3D* Action = UGenFalImageTo3D::RequestImageTo3D(this, Settings);
    Action->OnComplete.AddDynamic(this, &AMyActor::OnModelComplete);
    Action->Activate();
}
PBR Texture Generation with Google
#include "Models/Google/GenGoogleTextureGeneration.h"
#include "Data/Google/GenGoogleTextureStructs.h"

void AMyActor::GenerateTexture()
{
    FGenGoogleTextureSettings Settings;
    Settings.Prompt = TEXT("Weathered red brick wall");
    Settings.TextureMapType = EGenTextureMapType::FullPBR;
    Settings.bSeamless = true;
    Settings.ImageSize = TEXT("1K");

    UGenGoogleTextureGeneration* Action = UGenGoogleTextureGeneration::RequestTexture(this, Settings);
    Action->OnComplete.AddDynamic(this, &AMyActor::OnTextureComplete);
    Action->Activate();
}
Output Formats
Generated 3D models can be imported in the following formats:
| Format | Description | Best For |
|---|---|---|
| GLB | Binary glTF — compact, includes textures | Default for most providers |
| FBX | Autodesk FBX — preserves materials and animations | Rigged models, animation workflows |
| OBJ | Wavefront OBJ — simple, universal | Basic geometry |
| USDZ | Universal Scene Description | Apple ecosystem, AR |
| STL | Stereolithography — geometry only | 3D printing |
All 3D models are imported into the Content Browser as UStaticMesh assets via Unreal’s Interchange system, and automatically opened in the static mesh editor for preview.
Blueprint Helper Nodes
The plugin includes utility Blueprint nodes for working with generation results:
Runtime Nodes (available in all Blueprints)
| Node | Description |
|---|---|
| Save Model To File | Saves a FGenModel3DResult to disk with the correct extension (.glb, .fbx, etc). Auto-generates a timestamped filename if none provided. |
| Save Bytes To File | Saves any byte array to a file on disk (PNG textures, GLB models, etc). |
| Create Texture From Bytes | Creates a transient UTexture2D from raw image bytes (PNG, JPEG). Use this to display generated textures on materials or UI widgets at runtime. |
Editor-Only Nodes (available in Editor Utility Blueprints)
| Node | Description |
|---|---|
| Import Model To Content Browser | Imports a 3D model file (GLB, FBX, OBJ) into the Content Browser as a StaticMesh or SkeletalMesh asset. |
Example Blueprint Workflow
[Meshy Image to 3D] -> (Result) -> [Save Model To File] -> (FilePath) -> [Import Model To Content Browser] -> (AssetPath)
[Google Texture Gen] -> (TextureBytes) -> [Create Texture From Bytes] -> (UTexture2D) -> [Set Texture Parameter Value]
Runtime mesh loading: For loading GLB models at runtime in packaged builds, use
Save Model To Fileto write the file to disk, then load it with a third-party runtime GLB plugin (e.g. glTFRuntime). UE’s built-in Interchange importer is editor-only.
Task History & Chained Operations
The plugin persists task IDs to disk (Saved/Config/GenAIModelGen/task_history.json), enabling chained operations across editor sessions. When switching to a chained mode (Retexture, Auto-Rig, Remesh, Smart LowPoly), the widget shows which model will be used — displaying the asset name or prompt alongside the truncated task ID.
This means you can:
- Generate a model, close the editor, reopen it the next day, and still retexture or auto-rig that model
- Chain multiple operations: Text-to-3D -> Auto-Rig -> Retexture without re-uploading anything
- The last 50 task entries are retained automatically
Each task entry stores the task ID, provider, imported asset path, original prompt, and timestamp.